How to Wire Network Cable in Wall for Networking
Knowing how to wire network cables in walls can be a game-changer when setting up a reliable network. Wired connections often provide better performance and stability than wireless alternatives, especially when network speed and consistency are crucial.
In this guide, we’ll show you how to install Ethernet cables through walls for home and office networking.
Whether aiming to improve your internet speed, reduce lag, or create a more streamlined and visually pleasing setup, understanding how to run and install these cables is essential. This introduction will set the stage for a detailed walkthrough to make your wiring project a breeze.
Understanding how to run Ethernet cables inside walls is not just about plugging in some wires; it’s about ensuring a seamless and safe installation that maintains the integrity of your home or office infrastructure.
Proper planning, tools, and step-by-step guidance are essential to successful network cable installation. By running the cables in walls, you eliminate the clutter of exposed wiring, making your space cleaner and more professional-looking.
A wired network can more efficiently handle higher data loads, which is especially important in settings that require robust networking solutions.
We’ll start by covering some initial considerations and planning steps for your Ethernet cables, followed by a list of required tools and materials.
From there, we’ll guide you on mounting the Ethernet outlet wall plates, measuring and running the cables, and finally, connecting the wires to the Ethernet jacks.
Each step is designed to equip you with the knowledge to perform a professional-grade installation. Testing your connections will ensure everything is in perfect working order.
If you’re wondering why you need a wired network in your home, consider streaming 4K videos, experiencing low-latency gaming, or ensuring stable video calls.
Wired connections can support high-bandwidth applications and critical business operations for small office setups.
And yes, running a wire to an outdoor area can extend your network’s reach. With Switchback Systems by your side, learning how to wire network cables in walls is an investment in performance and reliability.
Required Tools and Materials to Run Ethernet Cable and Costs
Running Ethernet cables through walls requires careful planning and the correct tools and materials to ensure a smooth installation.
First, you need the right tools, including fish tape, rated for pulling through walls, to help navigate your cables through tight spaces.
A stud finder is essential for locating studs and avoiding them when drilling.
A power drill with various bit sizes will be your go-to for making precise holes in your wall. Don’t forget a utility knife for cutting drywall and an Ethernet crimping tool for terminating your cables.
When considering materials, you’ll need to invest in quality Ethernet cables. Depending on your speed requirements, Cat5e or Cat6 Ethernet cables are preferred.
Measure the total length you’ll be running to buy the appropriate amount. Cable clips and ties help manage and secure the cables within the walls. You’ll also need Ethernet wall plates, which help maintain a clean and professional look for your networking setup.
The costs for these tools and materials vary. Essential tools such as fish tape and stud finder are affordable. Still, specialized equipment like Ethernet crimping tools can be more costly. Ethernet cables also differ in price based on their category and length.
Depending on the extent of your installation, running Ethernet cables through walls can typically cost between $50 and $200.
With these tools and materials, you can start your project confidently. Making sure you have all the necessary items before you start will save you time and effort in the long run, ensuring a smooth and efficient installation process.
Ready to get started? Let’s move on to the next step, where we’ll discuss mounting the Ethernet outlet wall plates.
Mounting the Ethernet Outlet Wall Plates
After planning and gathering the necessary tools and materials for wiring, you’re now ready to mount the ethernet outlet wall plates. This step is crucial for both functionality and aesthetics when running ethernet cable through the walls of your house.
Properly installed wall plates ensure a clean look and make connecting your network devices more accessible. Begin by determining the exact point where the ethernet outlet will be installed.
When making the hole, use a stud finder to ensure you won’t cut into any studs or existing wiring. Once you’ve identified the correct spot, mark it with a pencil.
Using a drywall saw, carefully cut out the marked section. Ensure the opening is large enough to accommodate the wall plate but not too big to be unsightly.
Next, insert a low-voltage mounting bracket into the cut-out section of the wall. This bracket serves as a secure base for the wall plates and ensures they sit flush against the wall. Fasten the bracket using screws, tightening them to secure the bracket firmly but not so tight that you risk damaging the drywall.
Proceed by pulling the ethernet cable through the wall opening. If you’ve threaded the cable down from an attic or up from a basement, ensure you have enough length to comfortably connect to the ethernet outlet without straining the cable.
Feed the cable through the opening in the mounting bracket. It’s time to attach the ethernet cable to the wall plate. Remove the outer insulation of the cable, exposing the internal wires. Follow the wiring color code guide to attach each wire to the corresponding terminal on the back of the wall plate, ensuring that each connection is secure.
Once the wiring is complete, screw the wall plate onto the mounting bracket. This completes the mounting process for the ethernet outlet wall plates. It would help if you now had wall-mounted plates with the ethernet cable securely connected and ready for further steps in network wiring.
The newly mounted wall plates will provide a high-speed network connection point and contribute to your house’s tidy and organized appearance. Following these steps accurately ensures reliable network wiring throughout your home.
Measuring and Running the Ethernet Cables
After mounting your ethernet outlet wall plates, it’s crucial to ensure correct measuring and running of the ethernet cables within the walls. Accurate measuring guarantees enough cable length to connect your devices without unnecessary surplus.
Start by measuring the distance from your network switch or router to each outlet where you intend to install the ethernet cable. Mark these measurements on the wall to guide your running path, helping you avoid obstacles such as electrical wiring or plumbing.
Once you have your measurements, it’s time to run the ethernet cables. Begin by drilling access holes in the top or bottom plates of the walls through which the wires will be pulled. Use a fish tape or a similar tool to guide your cable through these holes.
Attach the end of the ethernet cable to the fish tape, then carefully pull it through the wall and to the desired outlet location. During this process, ensure the cable is free of damage or kinks, which could affect performance.
It would be best to opt for high-quality copper ethernet cables, known for their excellent conductivity and reliability.
Label each end to identify its destination as you pull the cables through the walls, simplifying the setup process. Secure the ethernet cables inside the wall with cable ties or clips to prevent them from becoming tangled or damaged.
Be cautious not to tighten the relationship too much, as compressing the cables can degrade performance.
After pulling and setting the wires, it’s essential to double-check your work. Ensure all holes are adequately patched and the wall plates are securely mounted, ready for the next steps in the installation.
This systematic approach to measuring and running your ethernet cables can save you time and headaches later.
With the wires in place, you can connect them to the ethernet jacks, ensuring a robust and reliable network connection throughout your home or office.
At Switchback Systems, we recommend using high-quality tools and materials to guarantee the longevity and efficiency of your network installation.
Connecting the Wires to the Ethernet Jacks
Wiring ethernet cables through walls is crucial for building a durable and efficient network. Once you’ve measured and run your cables through the walls, the next step is to connect these wires to the ethernet jacks.
When connecting the ethernet cables, ensure the wiring follows the T568A or T568B standard. First, strip about an inch of the outer jacket of the ethernet cable to expose the internal wires. You’ll find eight smaller wires inside, each with its specific color – these need to be connected correctly for your network to function.
Separate and align these wires in the appropriate order based on the standard you’re following. Ensure no tangles or twists are left to avoid interference or connectivity issues later.
Next, take the ethernet jack and gently insert each wire into its designated slot. Most jacks come with a small diagram showing the proper color coding for the cables. Use punch-down tools to firmly press the wires into the slots, ensuring a stable connection.
If you’re unsure about the placement, refer to instructional material or the manufacturer’s guide. This step is crucial as a loose or incorrect connection might impair your network performance or render the port unusable.
Test each port by plugging in an ethernet cable and checking the connection with a network testing tool. This will help you identify any potential miswiring or issues immediately.
If any problems are detected, you’ll need to re-check the wiring and make adjustments as necessary. Lastly, once verified the connections are correct, secure the ethernet jacks back into the wall plates.
Double-check to ensure that everything is snug and secure. When done correctly, your wiring job will provide a reliable and fast network throughout your site. You’re closer to a fully functional wired network with all the cables connected to the ethernet jacks.
Properly connecting the wires to the ethernet jacks ensures robust and uninterrupted connectivity for those setting this up in a home or office. If you feel unsure at any step of this process, it’s recommended that you consult a professional electrician or IT specialist.
Testing Your Ethernet Connections
After you’ve installed your network cables, testing your ethernet connections is crucial to ensure everything is functioning correctly. Start by gathering a few essential tools for testing, such as an Ethernet cable tester.
Connect one cable end to your installed outlet and the other to your testing device. This process will verify if the cables were correctly installed and the wires are accurately connected to the jacks.
Next, take the time to examine each connection. Plug the other end of the Ethernet cable into a network device, like a computer or a router, and ensure the connection is stable. You can also check if the linked devices are successfully communicating through the network and if data is being transmitted without interruptions.
If your testing device or the linked devices indicate any issues, you may need to double-check your wiring. Inspect the wires to see if they are securely fastened to the Ethernet jacks, and examine the outlet plates to ensure they are installed correctly.
Even minor mistakes in the wiring process can sometimes impact the connection quality. Testing more than once is always a good idea, as specific problems might not be immediately apparent.
Once your initial tests are successful, try running more comprehensive tests across multiple points in your network. Share your connection with several devices to see if the network holds up under increased load. This is essential for ensuring your network is robust and can handle various usage scenarios.
If you encounter persistent problems that you can’t solve, consider consulting professionals like Switchback Systems. We offer a range of services to help ensure your installation is flawless.
We can provide advice tailored to your specific site conditions and help you troubleshoot any issues.
Testing your ethernet connections thoroughly confirms that your installation was a success. It assures that your network is reliable and ready to meet your needs. Don’t skip this vital step; by following these procedures, you’ll have a fully operational network prepared to use!
Why might you need a wired ethernet in your home?
In today’s digital age, having a reliable internet connection is essential for numerous activities, from streaming movies to working from home. While Wi-Fi is convenient, it often needs to improve speed and reliability.
This is where having wired ethernet in a home becomes beneficial. A wired ethernet connection offers a stable and high-speed internet experience that can handle multiple devices simultaneously without any degradation in performance.
One significant advantage of wired ethernet is its ability to provide a consistent and robust network connection. Unlike Wi-Fi, which can be disrupted by walls, distance, and interference from other devices, ethernet cables ensure constant speed.
This is especially critical in a house where multiple users stream high-definition videos, play online games, or conduct video conferences.
Installing ethernet cables through walls might seem complex, but the benefits greatly outweigh the effort. Once set up, a wired internet connection can significantly enhance the quality of your digital life.
Whether a professional working from home or a gamer requiring low latency, an ethernet connection ensures you’re always connected without interruptions.
Another reason you need wired ethernet in your home is its security. Wifi networks, even those with strong passwords, are susceptible to unauthorized access. In contrast, a wired network is considerably more secure.
Ethernet cables physically connect your devices to the network, eliminating the risks associated with wireless breaches.
Furthermore, wired connections can make your house more efficient if you have smart home devices. Smart TVs, home assistants, and security systems operate more reliably when connected via ethernet.
You won’t have to worry about buffering issues or dropped connections that can happen with wifi.
Wirewifihernet is also an excellent way to extend your network to areas where Wi-Fi signal strength is weak. By running ethernet cables through the walls to these locations, you can ensure every part of your home has a strong and reliable internet connection.
In conclusion, consider installing wired ethernet cables in your home to maximize internet speed and reliability while enhancing security. With some planning and effort, you can transform your house into a well-connected digital hub.
Wire the jack yourself for a small office.
Wiring the jack yourself for a small office is more manageable than it might seem. Whether setting up a new Ethernet network or expanding an existing one, you can install Ethernet cables through walls with some essential tools and patience.
First, determine the optimal locations for your network outlets. Identify where your small office needs Ethernet connectivity, such as desks, conference rooms, and server areas. Once you’ve marked these locations, you can begin wiring by drilling small holes in the walls to feed the cable through.
You’ll want to run your Ethernet cables from your network distribution panel to the designated outlet locations. Measure the distance between these points to ensure you cut the right length of cable.
After measuring, you’ll need to feed the Ethernet cable through the walls to the outlets. Use fish tape or a similar tool to help guide the cable through tight spaces. Label each end of the cable to avoid confusion during the connection phase.
Next, it’s time to wire the Ethernet jack. Carefully strip the outer insulation from the Ethernet cable, exposing the inner wires. Depending on the jack type, you may need to arrange the cables according to T568A or T568B standards; these color-coded wiring schemes ensure proper network connectivity.
Insert each wire into the corresponding slot on the jack and use a punch-down tool to secure them in place. Be thorough to avoid any loose connections that might affect your network’s performance.
Once the cables are connected to the jacks, mount the jacks into the faceplates and secure them within the wall outlet boxes. Screw the faceplates onto the outlets for a clean, professional look.
Finally, connect the other end of the Ethernet cable to your network switch or router, ensuring a reliable connection to your small office network. Use a network cable tester to double-check each connection.
This step will help catch any miswiring or faulty cables, ensuring everything runs smoothly. Wiring the jack for a small office is a cost-effective way to enhance your network, providing fast and stable Ethernet connections to all your desired locations.
With a little effort and some planning, you can successfully wire your entire office.
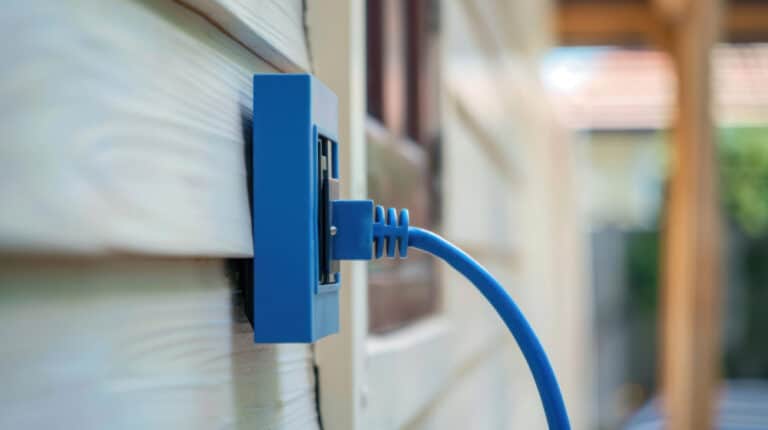
You can even run a wire to an outdoor area to get good wiFi
It’s wifiuncommon to need a strong wifi signawifi outdoor areas of your house. With Switchback Systems, you can quickly run network cables through walls to various locations, ensuring a reliable connection.
To provide seamless Wi-Fi coverage outside, you can run an ethernet cable from your indoor router to the outdoor area. This will avoid the common problem of poor Wi-Fi signal caused by distance or obstructions.
This method involves running a wire from the house’s interior through the wall and out to the designated location, usually where you plan to install an outdoor Wi-Fi access point or router.
First, identify the cable’s entry and exit points on both the inside and outside walls. Measure the distance carefully to avoid unnecessary complications later.
Once the locations are determined, drill a small hole through the wall where the cable will pass. Ensure the hole is large enough for the cable to fit, minimizing any potential damage to the wall or wire.
Next, you need to thread the network cable through the hole. This step can be challenging without the proper tools. A cable puller helps navigate the wire through the wall and saves you time and effort.
Once the cable is pulled through, install an ethernet outlet wall plate on both sides of the wall. This will provide a clean and professional look while protecting the cable connections from wear and tear.
Connect the wire inside the wall plate to an ethernet jack, following the wiring diagram to ensure correct connectivity.
After wiring, connect the other end of the cable to your indoor router and the ethernet jack to your outdoor access point. Test the connection to ensure that you’ve installed everything correctly.
Testing is crucial to confirm that the network cable provides a consistent and robust signal for adequate Wi-Fi in Wi-Fi locations. Following these steps will allow you to enjoy uninterrupted internet access outside, which is vital for activities like work-from-home setups, outdoor entertainment, or even smart home devices.
In conclusion, installing Ethernet cables through walls can significantly enhance your network’s performance and reliability.
By following the steps outlined, you can ensure a clean and professional setup. Proper network wiring is essential whether upgrading your home network or setting up a new office.
