Installing Dish Network: Step-by-Step Guide
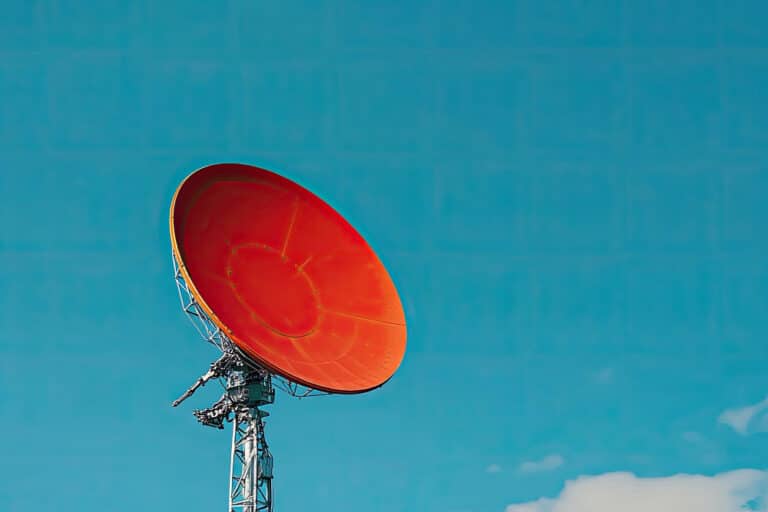
Setting up your Dish Network satellite system doesn’t have to be a daunting task. Following this step-by-step guide, you can easily install your satellite dish and enjoy your Dish TV experience. First, determine the best location for your satellite dish installation.
Ensure a clear line of sight to the southern sky, as obstructions like trees or buildings can interfere with the signal. Remember, proper location is crucial for optimal satellite TV reception. Next, assemble the satellite dish.
Follow the instructions provided with your Dish Network package. Typically, this involves attaching the LNB (Low-Noise Block downconverter) to the dish, securing the mounting bracket, and attaching any necessary arms.
The dish should be firmly assembled to ensure stability during adverse weather conditions. Once assembled, mount the dish on a sturdy surface. You can install the dish on a roof, wall, or even a ground pole, depending on your preference and the setup of your home. Ensure the mounting surface is stable and capable of supporting the weight of the dish to avoid any potential issues.
After mounting the dish, it’s time to align it. Use a compass to find the correct azimuth angle, and adjust the dish’s elevation and skew according to the instructions. Many satellite receivers feature an on-screen signal meter to help you fine-tune the alignment. Have someone monitor the signal strength indoors while you make slight adjustments outside until you achieve the best possible signal.
Once the dish is correctly aligned, connect the coaxial cable to the satellite receiver. Make sure the connections are secure to avoid interference. Then, follow the receiver setup instructions, which usually involve plug-and-play installation.
The receiver will automatically search for satellites and download necessary updates. With everything connected, turn on your television and follow the on-screen prompts to complete the Dish Network setup. You’ll likely need to activate your service online or via phone. Congratulations, you’re now ready to enjoy your satellite TV with Dish!
Dish Setup: How to Mount and Align Your Satellite Dish
Setting up your Dish Network satellite dish might seem daunting, but with the right guide and equipment, you can get it done without too much hassle. First, you’ll want to select an optimal location to mount your satellite dish.
Ensure it’s an unobstructed area with a clear view of the southern sky, as this is essential for receiving a strong signal for your satellite TV.
When you install the dish, please attach it to a sturdy structure. Common locations include rooftops, walls, or poles anchored firmly into the ground. Once the mount is secure, it’s time to align your satellite dish.
Start by connecting your dish to the receiver using the provided coaxial cables. Switch on the receiver and television, then navigate to the satellite setup menu on your Dish TV. The on-screen guide will help you with the satellite alignment process.
You must adjust the dish’s azimuth, elevation, and skew for optimal reception. This process of fine-tuning ensures you’re hitting the satellite signal directly. Often, a signal meter or a mobile app can aid you in accurately aligning your dish network satellite dish.
After meticulously adjusting these settings, tighten all bolts and screws to secure the dish in its aligned position. Don’t forget to weatherproof all connections to guard against the elements. This will extend the life of your dish and maintain signal quality over time. Finally, run a signal strength test through your receiver to confirm you’ve achieved the best possible alignment for your satellite TV.
To install dish equipment successfully, it is crucial to follow every step detailed in the guide. Properly aligning your satellite dish will guarantee a seamless viewing experience and high-quality reception from your Dish Network. Keep this information handy as you set up and align your satellite dish for hassle-free installation.
Connect Dish Network Wiring to Your Hopper
When it comes to successfully connecting your Dish Network satellite to the Hopper, there are a few steps you follow meticulously. First, ensure your satellite dish is properly installed per the guidelines in our previous section on “Installing Dish Network: Step-by-Step Guide.” Connect your Dish Network wiring to your Hopper for smooth, uninterrupted TVHopperng.
Start by locating the coaxial cable from your dish. This cable is essential as it transmits the satellite signal from the dish to your Hopper. If you’ve mounted and aligned the Hopperr satellite dish correctly, the next step is to attach this cable securely to your Hopper. Ensure that the F-connectorHoppere coaxial cable is tightly screwed into the satellite input port of your Hopper. This will ensure a stable relationship between your dish and the Hopper.
Once connected, plug your HHopperinto a power outlet and turnHopper. During the initial boot-up phase, your Hopper will search for the satellite transmitted by your Dish Network satellite. If the dish alignment is accurate, your Hopper will automatically detect the Hopperal. You might be prompted to confirm settings or update software, which is crucial for optimal performance.
Next, we’ll focus on the HDMI connection. Take an HDMI cable and connect one end to the HDMI output of your Hopper and the other end to your Hopper input.
This will provide the highest-quality video and audio signals from your Dish Network satellite system to your television set. Ensure both the TV and the Hopper are powered on and tune the Hopper to the correct HDMI input channel to begin enjoying your satellite TV service.
Lastly, all connections and cables must be regularly checked to maintain the best signal strength. Troubleshooting tips and additional installation advice will follow in our section on “Professional Tips for a Smooth Install. ” Stay tuned for more expert tips and troubleshooting advice!
Professional Tips for a Smooth Install
Setting up your dish network satellite doesn’t have to be daunting. With the right professional tips, you can ensure a seamless experience from start to finish. Whether you’re a do-it-yourself enthusiast or simply looking to save on professional installation fees, our guide on installing a dish can make all the difference. First, gather all the necessary tools and materials before beginning the installation process. Having everything on hand can save you significant time and stress.
Next, take your time to properly mount and align the dish to ensure optimal signal reception. A misaligned dish network satellite can lead to poor picture quality or even signal loss, which nobody wants. For alignment, use a satellite finder or a professional-grade compass. These tools will help you achieve the perfect angle and elevation for your dish network satellite.
Pay attention to weather conditions while installing; windy or rainy days can make the process more challenging. If possible, choose a clear, calm day for your dish installation. Another pro tip is to keep the instructions readily available. This might seem obvious, but it’s easy to forget critical steps if you’re unfamiliar with the process.
During the wiring phase, ensure all connections are secure and free from any obstruction. Connect the dish network wiring to your Hopper or receiver carefully, and ensure the cables are not twisted or kinked. This avoids potential signal issues down the line. If your installation involves running wiring through walls or long distances, it may be worth consulting a professional to avoid potential pitfalls.
Lastly, don’t forget the final step of thoroughly testing your dish network setup. Ensure all channels are available and the picture quality meets your expectations. If any issues arise during this phase, it may be best to consult a professional to tweak the setup.
With these tips, you can feel confident tackling the dish network satellite installation yourself, potentially saving you the cost of professional installation.
Standard Warnings When Wiring Your Satellite Dish
When setting up your Dish Network satellite, you must know some standard warnings to ensure a safe and effective installation. Wiring your satellite dish might seem straightforward, but overlooking minor details can lead to significant issues. First and foremost, make sure all your cables are of high quality. Using substandard cable can lead to signal loss, poor TV reception, and investing in suitable quality materials when installing your Dish Network equipment.
A common mistake is not properly grounding your satellite dish. Failing to ground your satellite dish wiring correctly can be dangerous as it increases the risk of electrical surges and damage to your equipment. Always follow the manufacturer’s guidelines or consult a professional if unsure.
Another crucial point is to avoid bending the wiring excessively. Sharp bends can damage the cable, causing signal degradation and even breakage over time. Instead, use smooth curves when running the cable from the dish to your TV setup.
Mind the weather conditions when you install your satellite dish. Rain, snow, and extreme temperatures can affect satellite TV signals. Ensure the connections are waterproof and the dish is securely fastened to avoid misalignment due to strong winds. Additionally, always check your work. Ensure all connections are firm and secure; loose wiring can lead to intermittent signal issues, affecting your Dish Network experience.
When connecting multiple devices like a Hopper, ensure the wiring is done correctly to avoid potential conflicts or signal loss. Keep your cables organized and labeled to make future troubleshooting easier. Lastly, always follow local building codes and regulations concerning satellite dish installation. Ignoring these can result in fines or the need to redo the installation.
Adhering to these standard warnings when wiring your satellite dish can safeguard you from potential pitfalls. Proper installation not only enhances your Dish Network experience but also ensures the longevity of your satellite TV system. Don’t hesitate to seek professional help for a seamless installation if you’re in doubt.
Expert Q&A: How to Wire Dish Network at Home
Wiring your dish network satellite at home can seem daunting, but it becomes manageable with the proper guidance and tools. In this section, our experts answer some of the most frequently asked questions about connecting, installing dishes, and completing the process effectively.
Whether new to satellite dish installation or looking to improve your skills, this Q&A will cover everything from basic to advanced tips. Start by ensuring you have all the necessary tools and materials for your dish network satellite setup. You’ll need a satellite dish, cable wire, mounting hardware, and an appropriate receiver like the Dish Hopper.
Begin by selecting an optimal location for your satellite dish. It should have a clear line of sight to the southern sky to maximize signal reception. Once you’ve got the right spot, securely mount the satellite dish using the provided mounting hardware.
Next, it’s time for the cabling. Lay the cable wire from your satellite dish to your home, avoiding sharp bends or kinks that could degrade the signal quality. Our experts recommend using high-quality coaxial cable designed for satellite installations. When wiring the dish network satellite, connect one end of the cable to the LNB (Low Noise Blocker) on the satellite dish and the other to the receiver inside your home. After connecting the wires, the next step is aligning the dish.
Use a satellite signal meter or the signal strength feature on your Dish receiver to fine-tune the position. Alignment is crucial for optimal performance of your dish network. Once aligned, securely tighten all bolts and screws to keep the dish stable, especially in windy conditions.
Lastly, plug your receiver into your TV, power everything up, and follow the on-screen prompts for initial setup. This step-by-step approach to dish network satellite installation makes the process accessible even for beginners. With our expert tips and thorough explanations, you’ll become proficient at connecting and installing dish networks at home.
Using Cable for Your TV and Satellite System
Setting up your Dish Network satellite involves integrating cables to ensure a seamless experience with your satellite TV. Understanding how to use cables effectively is crucial because improper wiring can lead to poor signal quality, intermittent service, or even disrupt other devices. Whether installing for the first time or upgrading your system, here’s how to effectively manage your TV and satellite TV cable connections.
First, determine the type of cables you’ll need. Typically, coaxial cables are required to connect your satellite TV dish to the Dish Network receiver. These cables ensure that signals from the satellite dish are transmitted efficiently to your TV. Always use high-quality coaxial cables to avoid signal loss. Ensure these cables are properly secured and free from physical damage that might affect the signal quality.
Next, connect the coaxial cable from the satellite TV dish to the receiver’s “Sat In” port. This connection is the path through which your dish network satellite receives the broadcast signals. Secure the connections tightly to prevent them from coming loose over time. Loose connections can cause service interruptions, which can be frustrating during your favorite TV show.
After connecting the satellite TV dish to the receiver, you’ll need another coaxial cable to connect the receiver to your TV. Insert one end of the coaxial cable into the receiver’s “TV Out” port and the other into your TV’s “Coax In” port. This setup ensures that the signals from the dish network satellite are transmitted and displayed on your TV screen. Double-check all cable connections to make sure they are firm and secure.
Lastly, you might need HDMI cables if your setup requires a more modern connection. In this case, connect the HDMI cable from the receiver’s HDMI output to your TV’s HDMI input. This ensures high-definition quality on your satellite TV. For a perfect viewing experience, ensure all cables are neatly organized, avoiding tangled wires, which can cause signal interference.
Properly managing your TV and satellite system cables ensures you enjoy uninterrupted, high-quality TV experiences from your dish network satellite setup.
With these comprehensive steps, you can successfully wire your Dish Network satellite and enjoy seamless Dish TV service. Remember, following proper installation procedures ensures optimal performance and extends the life of your equipment.
If you encounter any issues, consult the Dish Network support resources or contact Switchback Systems for professional assistance. Enjoy your newly connected satellite TV, which was brought to you by Switchback Systems.
